Tuesday 13 December 2016

My Other Repurposed Hunk Of Plywood Sign- And My Other Christmas Decor


I finally finished my second repurposed 'hunk' of plywood sign for the wall above my couch.


The last blog that I posted was about finding some plywood in my garage and deciding to make some large Christmas signs out of them to hang above my couch. Which is a rather large area to fill. You can read that post here


This sign I decided to make less of a 'picture', and decided to simply write some wording on it. One of my favourite Christmas carols has always been 'Oh Holy Night'. This carol has some of my favourite lyrics in it. The lyrics I chose from 'Oh Holy Night' were the words "...A thrill of hope- the weary world rejoices". Isn't that a beautiful thought? I don't know about you, but I feel that the world really is a very weary place sometimes.


I used the same technique on this sign as I did for my other sign- drawing everything on with chalk first, then going over the lettering with paint when I was happy with the way that it looked.


Link for other sign here.


I used the same teal, grey, white and silver colours that I used for the other sign, so that they look like a set up on that expansive wall together.


 I thought that I would also add some of my other recycled/ repurposed/ thrifted Christmas decor to this post...since I've had requests to see how I decorate.


My Living Room:


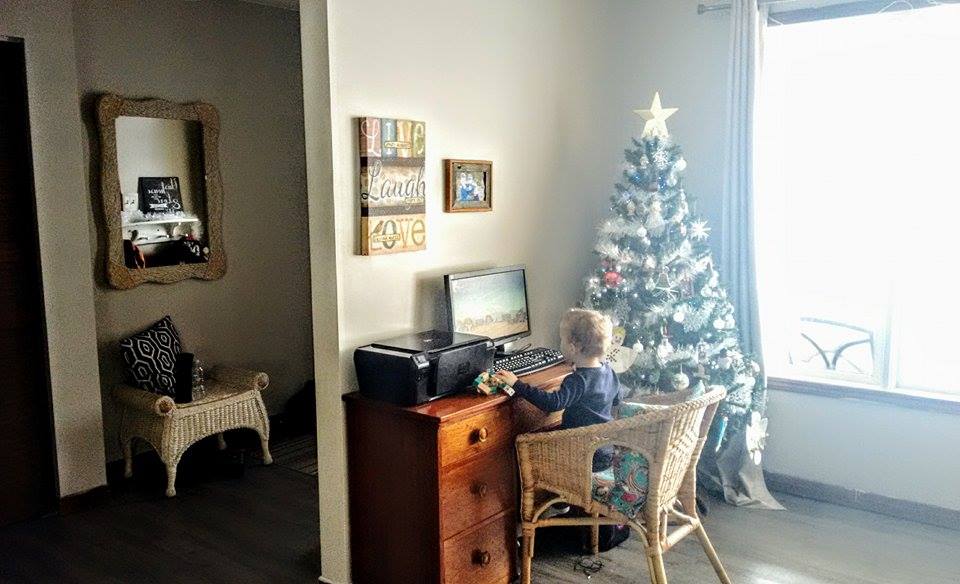
Here is my Christmas tree that I have reused for about 14 years now. In case you are curious about which is 'greener'- real or artificial- I wrote a post on researching it a few years ago. You can read about my findings here.


It's hard to see them in this photo, but I purchased these icicle-type Christmas lights for my window last year for about $15 off of kijiji.


My repurposed particle wood signs. Cost me $0.


Not Christmas decor- but I should mention that I picked up this seat/ottoman set from Value Village for $30.

The various holiday knick-knacks on my bookshelf were mostly given to me by my clients over the years. This year I put some thrifted lights inside my 'birdcage', and I am very happy with the result. 


My Dining Room: 


The Nativity Set was purchased by me my fist Christmas back here in Ontario in 2003.The runner was my Grandma's. The candle holders/ candles were thrifted.


The gift boxes have been gifted to me over the years. The Santa was my Grandmother's.


The Stairwell:


The garland, bows, and Snowman Family downstairs, all belonged to my Grandma.
(Try to imagine all of the natural wood painted out white- which is my plan...eventually).


My Gallery Wall/ Entrance Hallway:


Various Christmas decor items top my kijiji-ed dresser this Christmas. All were gifts from clients and loved ones.


My Kitchen: 


I used more of my grandmother's Christmas decorations in my kitchen. 


I used some red sparkly ornaments on some of my cupboards.


I used some of her garland above my kitchen window. 


 And these adorable vintage Santa candle holders/ Salt and Pepper shakers were my grandmother's as well. 


But, back to my sign- here it is hung for Christmas with the other sign, one more time. I'm thinking that I'll likely paint the other sides of the plywood to hang for the other 3 seasons of the year...but that is yet to be determined.


I'm really very pleased with how they turned out. 


I hope this post inspires you to repurpose/ recycle/ reuse your Christmas decor around your home!


Christmas Blessings, friends.


Friday 2 December 2016

My Repurposed Hunk Of Plywood Christmas Sign


While looking for something in my garage the other day, I came across a few 'hunks' of plywood. I call them hunks only because they weren't cut in any real fashion except to be able to fit into my vehicle.


While fixing a hole in my floor a few weeks ago, to my annoyance, the plywood depth that I needed only came in a HUGE piece. And it was $40 dollars. I needed such a small scrap-of-a-piece for my floor- but I assured myself that I would find use for all the other pieces one day.


And so I have.


I have a very large, empty spot on my wall above the sectional in my living room.


For the last 2 months, since I've moved in, I've been debating what to put up in that space. 


Well, at least for now- I have something to put there. A painted wooden sign. And every time I look at it, I have the satisfaction of knowing that I made it with my own 2 hands. I LOVE that.


I started out with my 2 'hunks' of plywood.


I then painted one grey (I picked up a quart of this grey colour for $3 in the mis-tints at Home Depot- and am painting my stairs/railings with this colour as well. Post on that to come), and painted the other a teal colour that I had hanging around, as well (I used this teal colour for the vanity in my last home- you can read that post here).


The grey one I envisioned as a night sky with 3 wise men on a hilly terrain- very similar to this reclaimed wood sign that I loved found here


First I painted the terrain the same teal colour as the other sign. I plan to hang them next to one another, so the colours will work nicely.


I then chalked in the lettering first. This is a great way to get sizing/ spacing right with no commitment at all. Once I had the lettering to my satisfaction, I simply painted over the chalk with white paint.


While I had the white paint out, I painted on the Wise Men with their camels. I free-handed while looking at these photos as a guide.


I debated using the white for the lettering for the word ADORE, but I'm pleased that I decided to go with the teal instead.


I added some stars in the white paint, and went over it with some silver that I had in my basement.


In the end, I also added some silver to the word ADORE. And, I'm very happy that I did.


So, there you have it, friends. A wooden Christmas sign that cost $0 dollars to make. The plywood was sitting unused in my garage, and the paint was already in my possession.


I will post soon on the other sign once it is finished and I have them both hung up on my wall.


Thanks for reading.


Blessings. 


Monday 28 November 2016

My Repurposed Ladder- Winter Edition


Well...I knew it had been a while since I last blogged.


New house, new relationship (will blog on that soon), kids, work.... all time-suckers.


But I didn't realize that my last blog was on the same item that I am writing on today- my repurposed ladder. Today it went from Fall decor to Winter decor.


I used the same ideas from the Fall sign- I wrote with a large black sharpie on 4 placemats, tied the placemats to the ladder rungs with yarn (actually saved the yarn from the fall sign, lol).


The vintage-y, Edison-type string of lights I picked up at the Re-Store for $40. 


 I never did get around to painting my garage door and my front door- but the red works for this season, I guess!


I apologize for the long break, readers, and will be writing a post on some more Christmas repurposed decorating ideas soon!


Blessings.


Thursday 20 October 2016

Large Outdoor Decor Piece Repurposed From An Old Ladder


A few weeks ago the littles and I were on our way to a friend's home for a swim. 


I happened to be distracted by a few pieces of furniture being brought out and displayed on a home's front lawn on our way. Not to be one to EVER drive by and not check out free or cheap furniture- I pulled a U-turn and parked.


An old, vintage-y-looking wooden ladder caught my eye right away. I asked how much and the guy shrugged and said five bucks. SOLD!!!


I bungee-corded the long ladder into my car along with my 3 boys and headed off to swim. When I got home and leaned the ladder up against the fence- I realized that it was a bit taller than I had first thought it was.


My original thought was to use it inside my home as an A-frame shelving unit, and decided that I would just saw off part of the legs to make it fit.


But then I saw ladders being used as outdoor decor (on Pinterest, obviously). I loved that idea. 


It was mid-September at this point- not QUITE autumn, but I decided that it was close enough. I found 4 matching placemats at Dollarama. I drew large letters on each one with a jumbo sharpie marker and had my 8 year old colour them in.


I used some yarn to attach the letters to 4 ladder rungs. This has worked perfectly.


I also picked up some fall-like leaf decor at Dollarama, as well. This will definitely be re-used for years to come. As will the placemat letters.


And, the finished product:


(Side note- the garage door was painted that way when I moved in....it's on the long list of things to paint...)


Hope you enjoyed my repurposed ladder DIY. And it cost me less than $15.


Thanks for reading, friends!


Blessings.


Monday 3 October 2016

What A Successful Thrifting Trip Looks Like In The Never New Home


Let me paint you a picture of a pretty much perfect thrifting experience for me. 


Friday morning, my friend Leanne calls to ask if I want to go thrifting at Talize. And....of course I do. Even though there are boxes and boxes still that need putting away- thrifting is my zen time. So I went.


I had in my mind that I would like to get some black boots and perhaps a black purse, as well. Last fall I found some great grey wool boots (seen here) and the year before that I had snapped up some very cute and comfy brown boots (seen here).


Alright...back to my morning.


Not only did I find some great black boots, but I found a purse as well. I also found an adorable sweater, a leather skirt (that I totally stole off of a mannequin), and a super cute dress. That is what I would call a successful thrifting trip.


Here are the items that I found:


Leather skirt (stolen off of the mannequin)-   $14.99


 Penguin sweater (I'm pretty much in love with this)- $6.99
Acid wash jeans- from a previous Talize score- $7.99 (also seen here)


 Black boots- $14.99


Black Purse- $17.99


Flowery dress- $12.99
Black flats- A previous Bibles For Missions score- $9.99


And there you have it, friends. An extremely successful thrift shopping day in my books.


That being said...if you add it up- it's also in the books of one of my more expensive trips. But I think with everything I purchased, I still got a steal of a deal.


Thanks for reading!


Blessings.


Thursday 29 September 2016

My Repurposed Mason Jar Lighting From Teal And Black Splattered Ugliness


A few weeks ago I posted a photo of these rather hideous lights that I bought at the Re-Store on Instagram and Facebook. I made note of how excited I was for the plans that I had in store for them.


I promised my followers that I would definitely blog about the finished products.


Well, here I am- a few weeks later- after waiting for a couple of weeks for internet at my new home, posting all about my 'new' mason jar lights.


The first thing that needed to go was the paint-splattered look on the hardware of the lights. I removed all the excess fixtures and taped up the bulb sockets (not sure the correct terminology- I kind of just make this up as I go along...).


I used my new favourite spray paint colour- Rustoleum's Oil Rubbed Bronze. It has a bit of a vintage-y vibe to it, which is the look that I wanted.


I had envisioned these with mason jars (which I had laying around in my basement- WIN) covering the light bulbs. But when I went to put the mason jar lid onto the arm of the chandelier- it was just a smidge too small. So frustrating.


I decided to try sniping the lid in several points and opening it up to slide it over the hardware. this seemed to work, and was surprisingly stable once it was bent back into place. 


My next hurdle came when I realized that my jars were to small to fit over a normal lightbulb. Ugh. So, out I went to find smaller lightbulbs. I found some at Dollarama for $1.25 each.


But then, looking at the snipped-up jar lid...I was not happy at all with the result.


It was actually my mother that suggested just spray painting the lids, as well. And that worked

just perfectly.


 I do still need to add some chain/ wire to the chandelier that I will put in my new kitchen. Now that I have figured out a breakfast bar area (blog post to come), I can install it just where I want it.


But here is the finished/ installed photo of the smaller of the lights. I put it up in my front entrance way and just love it! 


PLEASE try to ignore all of the wood trim. Painting all of it white is on my very, very long to-do list.


Thanks for stopping in and reading, friends! Hope you enjoyed my repurposed light how-to.


Just another reason to try thrifting! You get to completely customize your own look and have a completely original home. Not to mention the money saved! The lights cost me under $35 for both of them and the spraypaint/ lightbulbs were maybe another $20 total. Not bad for 2 'new' light fixtures, I'd say!


Not too bad, at all.


Blessings.


100 Days Sober

*Trigger Warning. Sexual Assault Content * Today I'm 100 days sober. Getting sober has definitely caused me to dig deep, wit...